The electricityMap powerered light bulb
A few weeks ago, I spent the weekend building a light bulb that changes color depending on the current carbon intensity of your country's electricity. If you find this fun and want to build this little gadget yourself, then here's a guide explaining the process.
How was it built?
The bulb was built using the open source firmware espurna. Espurna provides a ton of features that makes the implementation easier. Most notably Over-The-Air updates, easy wifi setup, and a neat web interface. I used the light bulb Arilux E27, but espurna supports a long list of devices so you can probably use any of those if you are following along.

Prerequisites
- An Espurna compatible light bulb
- An ESP8266 programmer
- A soldering iron
Building the binary
Start by cloning the repo https://github.com/FelixDQ/electricitymap-lightbulb and open plugin.ino (at code/espurna/plugin.ino).
Here you need to insert your api key. You can get one from co2signal.com if you don’t have one yet. Furthermore, you need to insert the zone key of the location that the light bulb should connect to. After changing the values, you are are ready to build the binary. It’s easiest done using PlatformIO, and I recommend following this guide.
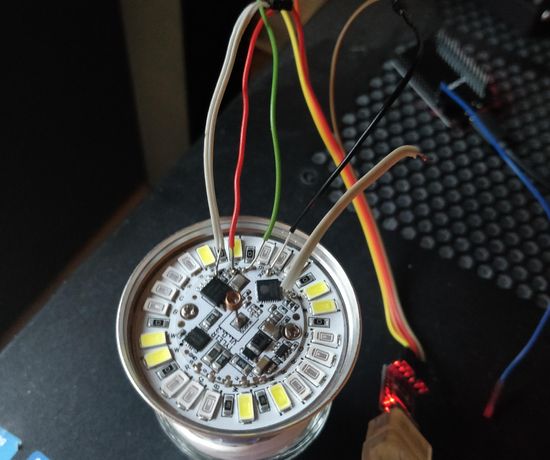
Prepare the chip for flashing
With the binary ready, we can start flashing. Start by popping the cap off the bulb and identifying the pads. The pads on the Arilux E27 are clearly labeled with 3V3, GND, TX, RX and IO0. If you are using another bulb then have a look at the espurna wiki where people have created guides for most of the supported devices.
Soldering the wires to the PCB can be little bit intimidating, but it’s not too difficult. Tin the pad by leaving a small drop of tin on the pad and heating it with the soldering iron. Then touch the wire and heat them together for less than a second. Be careful that you don’t burn the pad off, and that you don’t get tin into the other components.
Now we can connect the wire to programmer. TX → RX, RX → TX, GND→GND, IO0→GND and 3V3→3V3. Be careful that you don’t connect it to 5V. Start by booting the board into flash mode. We do this by connecting IO0 to ground before connecting the power. You can disconnect IO0 after it has booted, and it will boot into normal mode on the next boot. Plug the programmer into the computer, and you are now ready to flash the board
Flashing
For this step you will need esptool. You can download it from here https://github.com/espressif/esptool
Start by erasing the old flash. You can take a backup if you want to keep a copy of the stock firmware
esptool.py --port /dev/ttyUSB0 erase_flashThis will reboot the board, so make sure that it boots into flash mode again. Now we can finally flash the board with our new firmware:
esptool.py write_flash --flash_mode dout 0x00000 firmware.binFinal configuration
Now we can boot the board into normal mode. This is simply done by powering the board without connecting IO0. Do not insert the bulb into a socket while you are connected to the board or are tinkering with it. That can be very dangerous.
After starting the board in normal mode, you should see a SoftAP called ESPURNA-XXXXXX. Connect to it using the password “fibonacci”. Then go to http://192.168.4.1 or http://192.168.244.1 and log in with “admin” as the username and “fibonacci” as the password. If this works, then you can disconnect all the wires, put the cap back on and put the light bulb into a socket. It should start blinking slowly. That means that it doesn’t have a wifi connection. Connect to the SoftAP again and configure your wifi connection. If it works you should see the bulb stop blinking and finally changing color into the electricityMap color of your country. Woohoo, we made it!